My Role
UX/UI Designer - Interaction Design, Visual Design, Animation Assets, User Flows, Rapid Prototyping
Team
Ali Raza - Developer
Timeline
1 Month
Overview
Imagine a busy HR team trying to manage employee data with a tablet-based application that was meant to streamline their work, but instead, it caused constant frustration. The WebHR Kiosk, developed as an MVP without UX/UI considerations, left users struggling to complete even the most essential tasks.
I led the end-to-end redesign, focusing on optimizing the user experience for both employees and HR personnel. Through thorough research and design, I resolved key user journey issues, creating a smoother and more intuitive application.
The final design exceeded expectations, resulting in highly satisfying outcomes. By reducing repetitive tasks, HR personnel achieved their goals effortlessly, enhancing the overall user experience.
Highlights
An end-to-end experience & interface redesign for WebHR time & attendance kiosk application
0.1
Video
0.2
Video
0.3
Video
Context
Mapping the Journey
Primary user groups for Kiosk Application →
The WebHR Kiosk Application was designed with two primary user groups in mind, HR Administrators and Employees. Each has specific responsibilities and tasks that are crucial for smooth HR operations.
HR Administrator
Login Company Instance
Manage Employee Data
All Employee Actions
Employees
Log Attendance
View Schedules
and Manage Personal Notes
Despite its purpose, the app made routine tasks harder than expected. Early user insights uncovered pain points that left both but specially HR teams frustrated. What was causing this breakdown? Let’s dive in.
Project Timeline →
Over the course of 4 Weeks, I redesigned the WebHR Kiosk Application, prioritizing user experience and eliminating key user journey flow issues for essential HR tasks.
1.0
Video
Research & Findings
Digging Deep to Drive Change
First things first →
I thoroughly documented the entire process of the current mvp application by capturing detailed screenshots at every step, from user login to the comprehensive range of HR actions like managing employee data.
2.0
Video
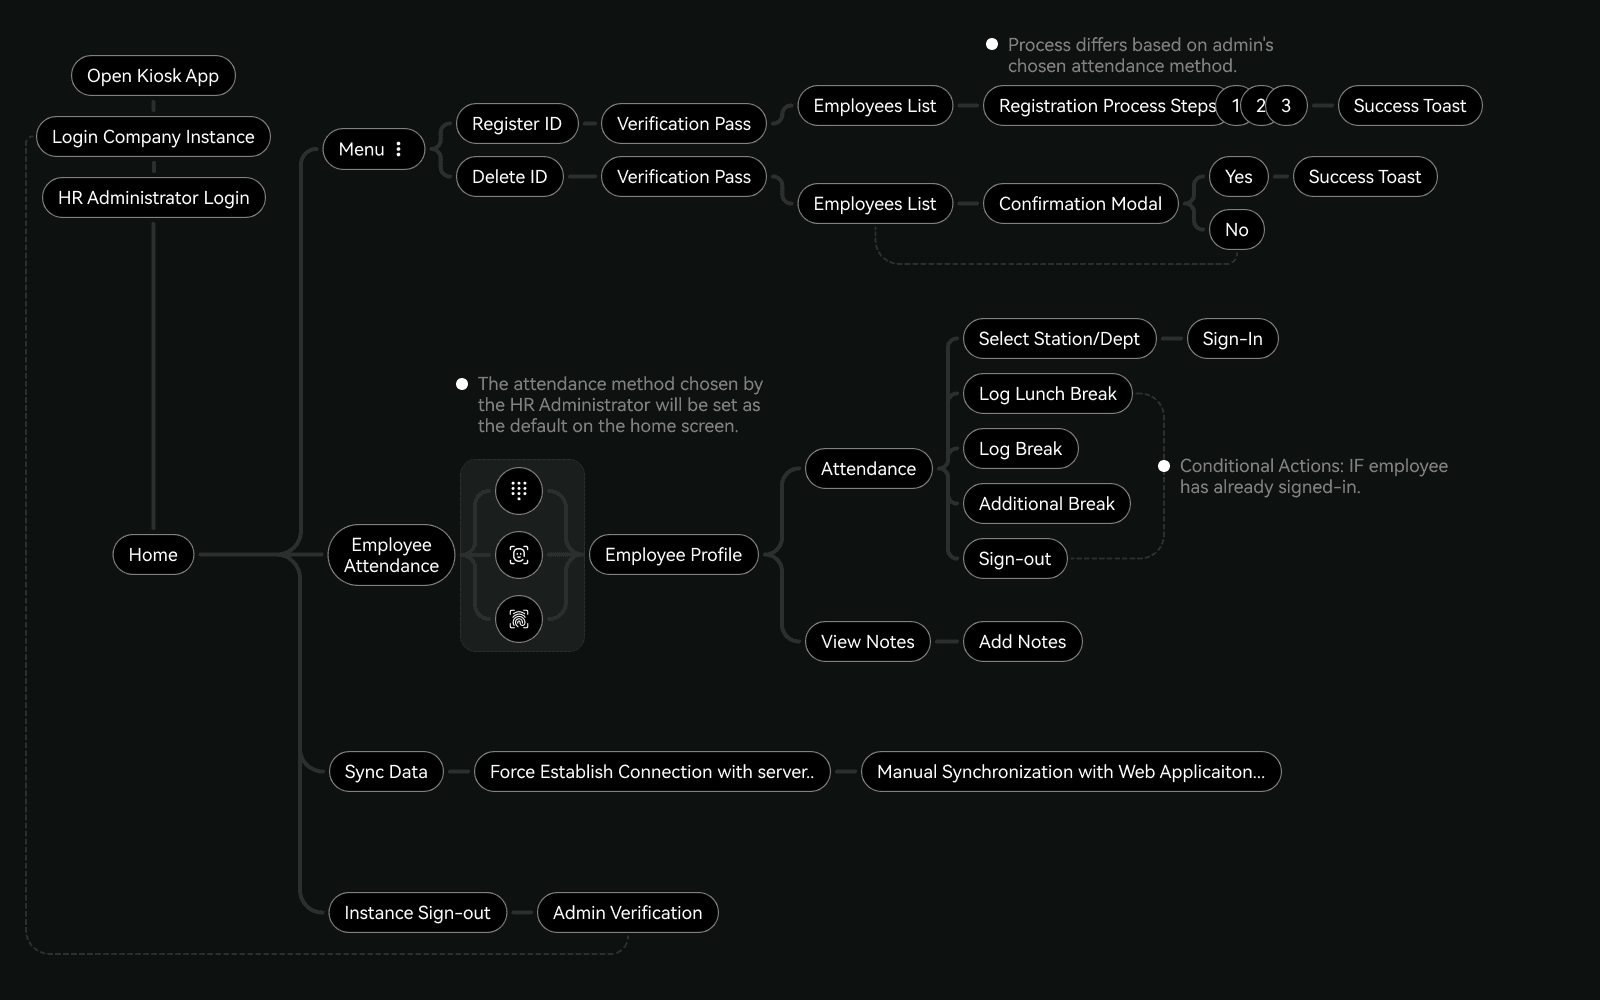
With the documentation as my guide, I mapped out the user journey map for the entire Kiosk application to gain a bird's-eye view across all current processes.
2.1
Image
Now, let's explore the Menu user flow, which centers on two key HR actions: registering new employee IDs and deleting existing ones.


2.2
-
2.3
Carousel
Building upon the Key HR actions, I mapped out the specific user journey steps for both registering and deleting employee IDs.
Register New Employee
Step 1
Tap the menu icon on the home screen to select Action.
Step 2
Select "Register Face"
Step 3
Enter the admin password for verification.
Step 4
Select "Employee"
Step 5
A multi-step process begins to complete the Registration.
Delete Employee ID
Step 1
Tap the menu icon on the home screen to select Action.
Step 2
Select "Delete Face"
Step 3
Enter the admin password for verification.
Step 4
Select "Employee"
Step 5
A confirmation modal appears to verify the deletion.
a point of friction was identified during this process
An identical, unorthodox step that repeatedly forces users to enter the admin password.
For every key action, HR users must enter the admin password.
Edge Case for Handling Concurrent Actions. What happens when HR needs to register an employee ID while simultaneously needing to delete another? The system's current design leads to an inefficient repetition of the verification process, indicating a lack of consideration for such concurrent actions.
The only method to search for an employee's record is by remembering their name.
Key data management limitation →
Beyond user journey friction, the kiosk application allowed registering and deleting employee IDs for biometric attendance methods only (Face ID/fingerprint). These key HR functions (Register/Delete) were not available with the access code method, prompting questions about this restriction's rationale.
Access Code
Face ID
Fingerprint
To find out the why behind system's limitations →
I connected with the developers over coffee to layout the system architecture. This helped me gain clarity on the scenario and strategize effectively, with a specific focus on the key areas.
2.4
Video
Discovery
Hardware integration Dependency
Unlike access code method, hardware integrations were mandatory for Data Synchronization and Registering employee data for biometric methods.
Because these methods implemented a dependent process for biometric data acquisition—where the employee's physical presence triggers data capture via the integrated hardware—hence, a more user-focused experience was crucial to prevent confusion during the process.

2.5
Image
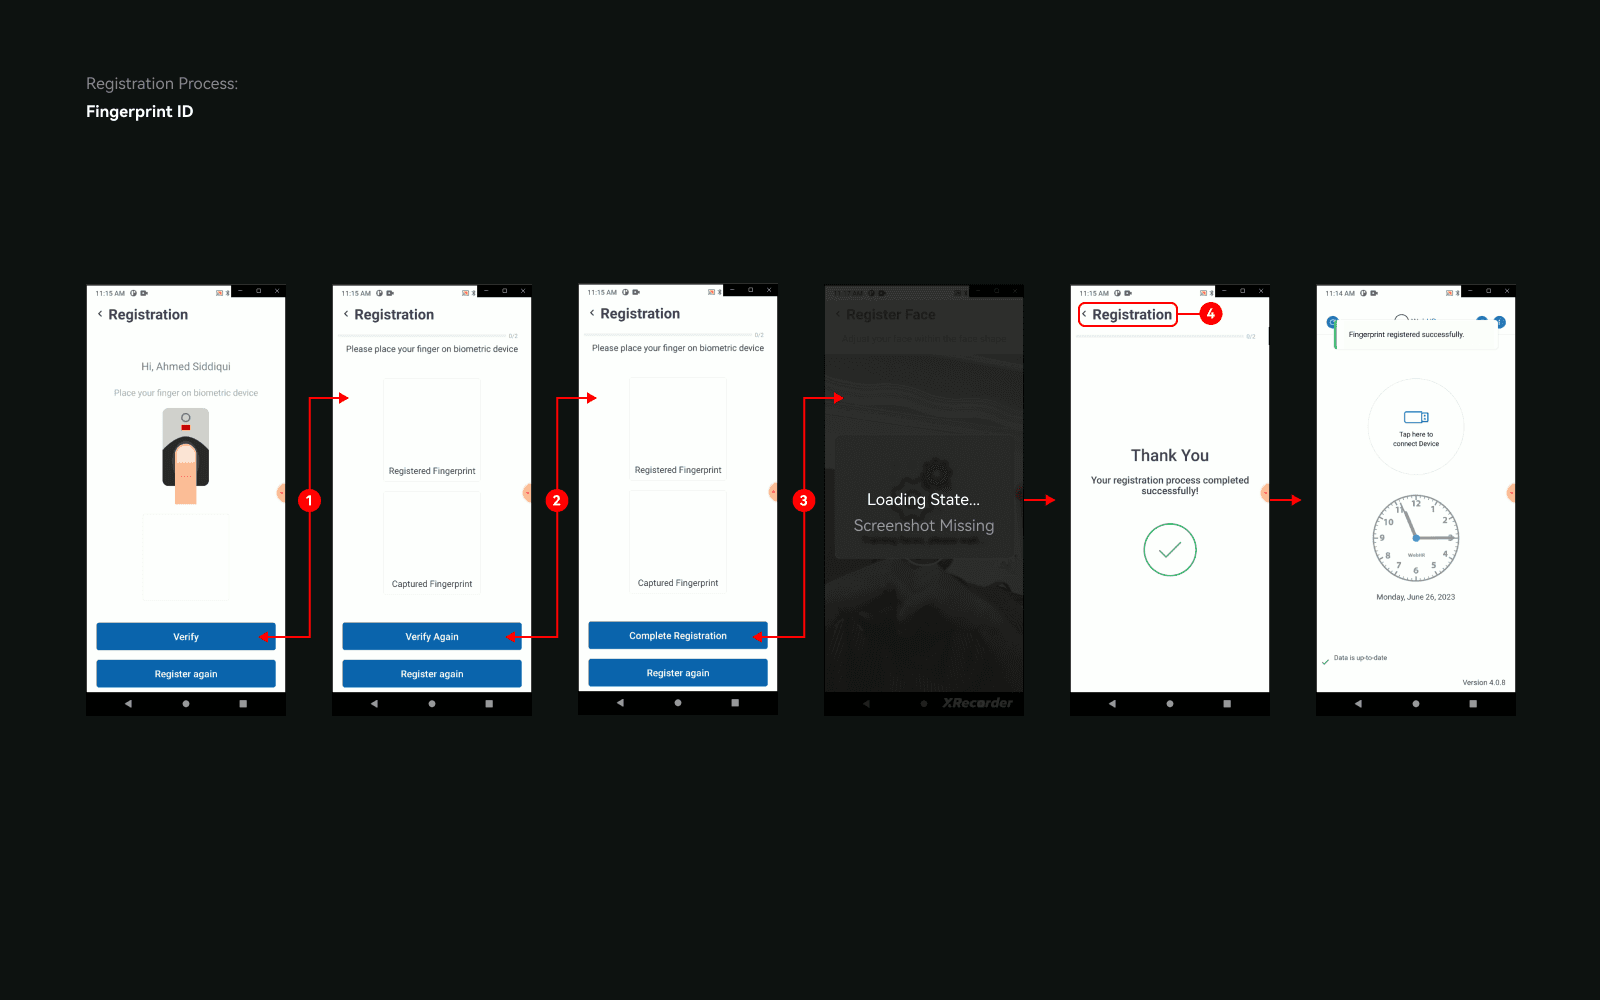
Having understood the hardware-dependent nature of biometric methods, let's now examine the current registration process for both of these biometric methods, Face ID and Fingerprint ID.

2.6
-
2.7
Carousel
Building on the understanding of the hardware requirements for biometric authentication, the following outlines the specific user journey for registering both Face and Fingerprint ID within the kiosk application.
Register - Face ID
Step 1
Take Front Face Photo
Step 2
Take Left Side Photo
Step 3
Take Right Side Photo
Step 4
Press "Done"
Leads to → Loading → Home Screen.
Register - Fingerprint ID
Step 1
Press "Verify"
(1st Fingerprint).
Step 2
Press "Verify Again"
(2nd Fingerprint, Initiates Comparison Results on Next Screen).
Step 3
Press "Complete Registration"
(Leads to → Loading → Feedback Screen).
Step 4
Press "Register (Back)"
Back Icon (Top Nav) → Home Screen.
A WHOLE LOT OF MESS GOING ON IN HERE
A confusing, disjointed user flow that makes a simple registration process harder than it should be.
No guidance before starting. HR users are given no clear instructions or context before they begin the registration process.
No feedback on progress. At no point are users informed about where they are in the process or how many steps remain—leaving them guessing throughout.
The registration process lacks clear indication (Affordance) of what action is expected from users at each step.
No fallback for face ID failures. If an employee’s appearance changes and their biometric data fails, the current system forces users through an outdated 10–15 step flow—deleting and re-registering the employee ID. (Ref: 2.2, 2.3 Carousel)
Confusing CTAs and unnecessary steps. Fingerprint-related actions are vague, and the process includes redundant steps that don’t need to be there.
Dead-end in the registration process. The current flow forces users back to the home screen after one entry—what if HR needs to register more than one employee?
One last usability flaw revealed itself →
While reviewing the login flow, I uncovered a minor oversight that introduced unexpected friction for admin level users at Instance login entry point.

2.8
Image
Minor Issues, Major Consequences
Subtle usability issues that created an unnecessary point of friction for HR Administrators.
The login field used a regular text input instead of a URL-specific input. As a result, it defaulted to capitalizing the first letter—leading to invalid instance errors unless users manually corrected the text.
Users wouldn’t receive instant validation. They were forced to wait through a loading screen before being shown an error.
When the error finally appeared, the message lacked clarity or actionable guidance—leaving users unsure how to resolve the issue.
The Solutions
Transforming Challenges into Opportunities
The existing system presented a clear design challenge →
And I tackled this challenge by dividing all the pain points into four key areas. Explore how I addressed each one below.
Key Challenge: 01
Repetitive actions for simple tasks, wasting time and increasing cognitive load.
Solution: 01
Simplified user journey
Introduced "Manage Face ID's" a single time verification gateway →
Authenticate once per session
Register/Delete Biometric ID in one place
4.0
Video
4.1
Video
Added "Multi-Attribute Filters" besides name-based search →
Employee Type
Department
Gender
Current Registration Status
4.2
Video